Pattern
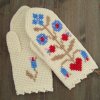
48. Mittens In Tunisian Crochet With Cross Stitch Motif
2014-02-15, by Jolanta Gustafsson
Yarn For Mittens: 75 % wool, 100 g = approx 260 m
Yarn For Embroidery: 75 % wool, 100 g = approx 200 m
Yarn Amount: approx 85 g for mittens, approx 10 g for embroidery (all colors)
Crochet Hook: Tunisian 4,5 mm or size needed to obtain the gauge
Gauge: 22 stitches and 21 rows in Tunisian simple stitch = 10 cm
Crochet Hook For Edging: 3 mm
Size: Woman's M
Measurements: 21/22,5 cm around above/below thumb, 25 cm long
Skill Level: Intermediate
Abbreviations:
st(s), ch/ch(s), sl st – stitch(es), chain/chain stitch(es), slip stitch
sc, dc – single crochet, double crochet
(3 dc) – work all the stitches within parentheses in next stitch
sk 5 – skip the indicated amount of stitches
pc – picot: ch 3 and work sl st into the third ch from the hook
{ } – repeat instructions within braces as many times as directed
Mitten
Leave about 5-6 m long yarn end for the edging and make mittens using the pattern #25.
Edging
The edging is worked in two rows, both rows are worked in same stitches along the edge. The shell lace is worked first, then a row of slip stitches is worked on the base of the lace. Use the yarn end that was left at the beginning of work. Insert hook in first stitch on the edge, yarn over and pull it through the stitch. Continue to work starting in this first stitch.
Row 1: ch 1, { 1 sc, sk 1, (3 dc, 1 pc, 1 dc), ch 2, sk 1, sl st } 10 times.
Row 2: Turn the work clockwise and chain 1. {Insert the hook in same stitch where sl st was worked, bring the yarn over the hook and pull it through the stitch and through the loop on the hook. Insert the hook in chain space, bring the yarn over the hook and pull it through the loop on the hook. Insert the hook in a stitch with 3 dc, 1 pc and 1 dc, bring the yarn over the hook and pull it through the stitch and through the loop on the hook. Work 2 slip stitches more in the same way inserting the hook into 2 next stitches on the edge.} 10 times.
Work cross stitch embroidery referring to the charts below. Note that the lower part of the motif on the back side of the mittens is asymmetrical! Finally sew up the sides of the mitten, fasten off and weave in all ends.
Chart 1
Chart 2
Good Luck And Happy Crafting!
